"Becoming Victoria"


I am honoured and excited to have been invited by the Llandrindod Wells Victorian Festival committee to appear as a young Queen Victoria at this year's festival from 22nd-28th August 2016. In preparation for this role I will be designing and making the costumes for the young queen over the coming months. These will be authentic reproductions of the fashions of the early years of Victoria's reign and will include a range of 1840s women's garments from corsets and petticoats to day dresses, ball gowns and bonnets. This blog will document and share my progress as I research, design and stitch each element to reveal the secrets of "Becoming Victoria".

Tuesday 30 August 2016

So tired!!!

Minus 2 days to go!! I can't believe the week flew by so quickly but I am glad to finally be able to sit down and take a break. I had an absolutely fabulous week but it was such a whirlwind. Apologies to any readers that have been waiting for photographs but I never had time to log on to the computer, never mind upload any pictures. However, I have finally downloaded the pictures from the camera and have also been sent some excellent images from photographers who were visiting the festival.

These are just a few shots that were very kindly shared with me by Neil Tudor. I will post more of the pictures of different events later on, once I have had a chance to sort through them. Many thanks to Neil for these beautiful shots which he so kindly sent to me today.

Photography by Neil Tudor

Sunday 21 August 2016

Looking forward to tomorrow

Only a few more hours to go....

The Llandrindod Wells Victorian Festival starts tomorrow and I am looking forward to being able to wear my finished costumes.  I will be appearing as the young Queen Victoria from 12 noon tomorrow and look forward to meeting anyone who has been following the blog that will be attending the festival. For those of you not attending, I will share pictures from the various events here throughout the week. Fingers crossed for good weather!

Photograph by Rob S Reynolds - from the Llandrindod Wells Victorian Festival Website

Tuesday 16 August 2016

A bonnet fit for a Queen

6 days to go and I think, fingers crossed, that Victoria's wardrobe is more or less finished.There are one or two little finishing jobs to see to, but all of the main garments are now complete.

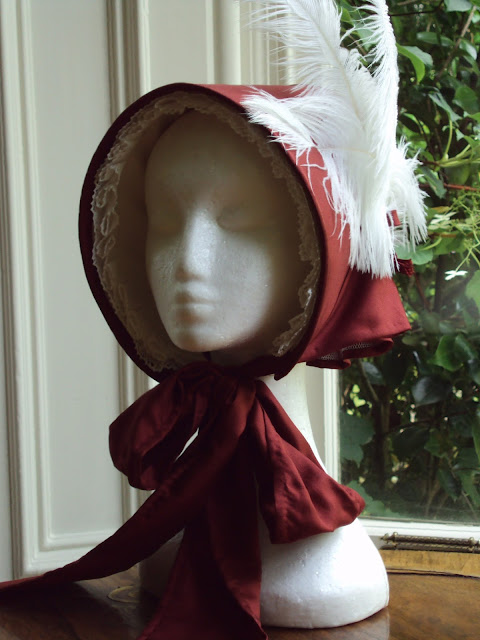
The last item to be finished was a bonnet for wearing to day time events.


Bonnets were an essential part of 19th century women's dress. They dominated millinery fashions throughout the first half of the century and were often regarded as emblematic of the ideals of Victorian womanhood: respectability, virtue, delicacy, authenticity and domesticity.* A woman could not leave the house with her head uncovered and bonnets were the most fashionable and most conventional choice of headwear.

Although the Queen would have worn a crown or tiara for state occasions and evening events, during the day she too wore bonnets. Unfortunately, there are very few early portraits of the Queen in everyday dress as most paintings depicted her in her robes of state, her wedding dress, or regalia. However, this 1856 portrait by Charles Lucien-Louis Muller depicts the Queen in a simple red day gown and white bonnet with ostrich feathers.

Queen Victoria, 1856, Charles Lucien Louis Muller (image found here)
There are also a number of the Queen's bonnets in the Royal Collections at the Museum of London, including a straw bonnet decorated with deep red ribbons.

"These are the only known examples of Queen Victoria's bonnets from before 1861" -  Bonnets, 1845-1855 , Museum of London (Mol.66.79/16,17,18)

Taking inspiration from the colour combinations in the portrait and extant bonnets, I chose a deep red silk twill that complements the red and gold silk gown for my bonnet with white lace and ostrich feather trimmings. The bonnet has the typical form of 1840s bonnets: a close fitting round brim framing the face and an almost horizontal line from the round crown to the brim, tied close under the chin. In the early 1840s, the brim extended forwards, hiding the wearer's profile, but towards the decade began to slip back to reveal more of the the hair and cheek.


The interior of the bonnet is trimmed with a lace ruffle that nestles around the face when worn. This will complete Victoria's outfits for daytime wear when out and about in town.

* References
Joanne Sullivan, "Bonnet Ribbons: A study of the use and representation of silk ribbons as ties on fashionable bonnets, 1830-1899", (Masters Dissertation, University of Glasgow, 2015)
Joan Nunn, Fashion in Costume 1200-1980, (London: The Herbert Press, 1984), 124.
Susan Hiner, Accessories to Modernity: Fashion and the Feminine in Nineteenth-Century France, (Philadelphia and Oxford: University of Pennsylvania Press, 2010), 3.

Monday 8 August 2016

I can't believe it's only two weeks to go!

14 days to go!!!

It's amazing how time seems to move faster the closer you get to a deadline. I have been hard at work on Victoria's costumes over the last week and unfortunately have let the posts slip a little bit.

Since my last post, we have been in the news....


A brief interview with the Brecon and Radnor express was published last week and can be viewed here. The picture is of me posing with Victoria's completed ballgown. Believe it or not, despite the apparent size difference in the photograph, the dress does actually fit on me!

I have also been working on my demonstration for the festival. This will take place at 3:15pm on Wednesday 24th August at the Hotel Commodore. For anyone attending the festival, this will be a chance to come along and see the costumes in person. I will be demonstrating every layer of an 1840s lady's toilette, from the chemise and bloomers right through to the shoes and bonnets and there will be plenty of opportunities to ask questions and see the costumes up close.


For this purpose, I have spent the last week stitching a chemise to be worn underneath the corset with a neckline that mirrors those of the dresses so that it won't stick out like my other chemises have done on the dress form. This chemise was loosely modelled on an original chemise in the Met Museum and altered to match the dress patterns that I will be wearing in shape.

The original chemise - MET 1978.251.2 1840-59 Linen chemise
I have also made a chemisette, based on an original pattern, which if like a false blouse or "dicky" that fills in the neckline of the dresses for daytime wear.

Example of an 1850s chemisette - MET_1978.314.6_1850s chemisette
Like this chemisette, mine is made of muslin and ties around the waist underneath the dress. Instead of embroidery I have added a lace collar.

Finally, I have been experimenting with dressing Victoria's wig but I will save the results to share in another post. Back to the stitching just now as I have a silk bonnet to finish for Victoria to wear when out and about in town during the festival week.

Thursday 28 July 2016

Victoria's Ball Gown

25 days to go...

I can't believe how fast the time is running out and I don't have long to post today. But before I get back to stitching (all the unexciting bits - eyelets holes and hook and eyes to fasten the dresses and boning channels) I just thought I would share some pictures of the finished ball gown. That is, finished without all of the hand-stitched lacing holes up the back!


Inspired by Queen Victoria's wedding dress, this gown has a deep pointed waist, double puff sleeves and a deep lace bertha at the neckline. This gown will be worn with the Queen's regalia for The Victorian Grand Ball on Friday 26th August and also for the Pageant of Queen Victoria's life on Tuesday 23rd August.


Wednesday 27 July 2016

Wedding Dress Inspiration

27 days to go...

I have spent the last few days working on my evening and ball gown for Queen Victoria.

I decided to base this dress on Victoria's wedding dress and the gown will also be worn during the festival for the Pageant of Queen Victoria's life which will include her wedding.

Queen Victoria's Wedding Dress, 1840(MoL D325 a & b, Royal Collection)
The original dress is made of Spitalfield's silk. It was originally creamy white but has discoloured over time and is now a darker shade of cream. The dress has a pleated skirt and a separate bodice. The bodice has a very pronounced point at the waist and is decorated with Honiton bobbin lace. The skirt was also originally trimmed with a wide Honiton lace flounce.

Close up of Queen Victoria in Sir George Hayter's painting, "The Marriage of Queen Victoria", 1842. The Royal Collections. Image found here

My dress will be made in a creamy coloured moiré fabric. This is darker than the original shade of the dress but is in fact quite close to how the dress appears now. The skirt is pleated like the original wedding dress and I have adapted the bodice pattern I used for my other two dress to feature a deeper point at the front and a double puff sleeve. The gown will be trimmed with lace, although unfortunately nothing quite as extravagant and beautiful as the original Honiton lace.

The dress is not an exact replica but more of a homage to the wedding dress which also reflects some of the other dresses worn by Victoria for famous portraits. Some of these may have in fact been her wedding dress but is interesting to note that many of the paintings which depicted this dress were not true to the actual garment itself. Nevertheless, despite the differences between the paintings and engravings produced and published at the time, I have tried to stay true to the uncluttered line and simplicity of the original which provoked a new fashion for wedding gowns.


In this 1842 portrait by Winterhalter the Queen appears to be wearing her wedding gown - however, the sleeves and the lace frill appear shorter than on the original dress itself and the lace is missing from the cuffs. (Image found here)

Thursday 21 July 2016

SIlk Dress Completed

31 days to go and the silk dress is complete (all bar a few finishing touches).


The final stages of construction involved preparing and mounting the skirts. Both the outer silk fabric and the cotton lining had to be seamed and then hemmed by hand separately. I machine stitched the large rectangles of fabric for speed but worked the hems by hand to keep the stitching as invisible as possible. I also hand stitched 4" wide strips of cotton wadding into the hem of the lining as well as two 14" squares at the back waist. This wadding was a feature of the original gown and helps to give a little extra body to the hem and the back of the dress.

Hem stitches worked on the silk
To create the V-shape at the front to match the point of the bodice, the fabric of both the skirt and lining were folded and pressed down. The two fabrics were then placed together with the folded down edges sandwiched between them.

Pressing down the upper edges to match the point of the bodice
From this point on the two layers of fabric were treated as one. I worked two lines of gathering stitched at precise 3/8" intervals. When drawn up these stitches created a concertina effect known as cartridge pleats.

Cartridge pleats from above
Cartridge pleats viewed from the front
These pleats were then sewn on to the bodice one at a time by hand with two stitches through the back of each pleat holding them in place.

Mounting the skirt to the bodice - one stitch at a time!
 This technique creates very small precise pleats that stand facing outwards away from the body rather than lying flat against it. They were a very common feature of dresses at this period and are visually very effective.

A close up of the finished pleats

So apart from the back fastening and some boning for the inside of the bodice this dress is now complete. These finishing touches will be added once I have tried on and fitted the dress for the last time to make sure that the back overlap is correct. The bodice will close with hooks and eyes and the boning will ensure that the bodice sits smoothly over the corset without any wrinkles.


Tuesday 19 July 2016

What Cinderella left behind

35 days to go...

In the interests of retaining a modicum of sanity I decided to take a few hours off from the dress construction. With time ticking though, I didn't want to abandon the project completely so I made a start on my dance slippers. A few hours relaxing embroidery and I am ready again to tackle the skirts on the silk dress.

During the 1840s, the most common form of women's footwear for dancing and evening wear was a silk or leather slipper. These little shoes are very similar to what we would identify today as a ballet pump.


Shoes worn by Queen Victoria for her wedding - Northampton Museum
Shoes at this period had no right and left foot but were instead made straight. The toe was often stiffened and tended to be much shallower than a modern shoe with a square toe.

Shoes were decorated with ribbons, rosettes and pompoms as well as with intricate embroidery. Women would often embroider shoes as gifts for friends and relatives. However, a dance slipper did not always last a long time. According to some accounts, the fine leather soles could be so thin that a particularly enthusiastic dancer could wear out her shoes by the end of one ball!

Ladies Mid-Nineteenth Century Embroidered Shoe (found here - a brilliant source for a whole range of Victorian footwear styles)
To create my dance shoes I started with an ordinary pair of white leather ballet shoes bought from a dancewear shop. I have worn these previously and they are, unsurprisingly, very easy to dance in! For a more authentic toe shape, dancers' demi-pointe shoes are better as they have a square toe and are stiffened with glue. However, the only pair I have are peach-coloured and leather pumps are more comfortable for dancing.

The shoes - BEFORE
My embroidery design was inspired by these Nineteenth Cenury baby shoes.

To decorate my shoes I used three shades of cotton embroidery floss, tiny green glass seed beads and gold-tone metal sequins which are specifically made to resemble the types of sequin used in historical dress. These are tiny metal discs with a hole pierced in the centre. The edge of the shoe is finished with a gathered strip of fabric to match the ball gown and long ribbons cross over the foot and tie around the ankle.

And ...AFTER...


Other foot to follow very soon!

Monday 18 July 2016

Bodice Construction - Part II - The sleeves

36 days to go and the sleeves for the silk dress are complete.

Fashions for sleeves changed with amazing rapidity throughout the nineteenth century, veering from one extreme to the other.

At the beginning of the century, gowns tended to feature short, puffed sleeves or long, narrow, fitted sleeves depending on the type of dress.

A fashion plate from 1815 found here
By the 1830s, however, sleeves had achieved quite incredible proportions and were known as "Leg O'Mutton" or "Gigot" sleeves. Indeed they were so large that feather-filled pads were worn around the upper arms to hold out the sleeves! (Click on the image below to find out more about this dress).

Sleeve detail on an 1830s dress in the collections at The Museum at FIT (Fashion Institute of Technology)
By the 1840s, with it almost impossible for sleeves to get any bigger, the reaction was for fashion to swing once more in the other direction. Slimmer, more fitted sleeves began to come back into vogue for day dresses. Evening dresses tended to feature very small, straight sleeves or little puff sleeves.

From "The World of Fashion" periodical, 1845 (found here)
The pendulum continued to swing in this way throughout the rest of the century with sleeves expanding and contracting almost with each decade.

For my 1840s silk gown, I have opted to make the sleeves convertible. Victorian etiquette dictated that during the day the arms and throat must be covered. In the evening, however low cut, short-sleeved gowns were considered both proper and fashionable. It was not uncommon for dresses at this period to be made with two bodices so that the same dress could be worn both during the day and for evening wear. There are also examples of wedding dresses with detachable sleeves and a fill-in for the neckline. This meant that the dress, worn for a morning wedding, could be converted and worn later as a ball gown or evening dress.

Inspired by this, I have cut my sleeves so that the lower sleeve is detachable. During the day, the bodice can be worn with the long sleeves and a chemisette (false blouse) to fill in the neckline.


The upper part of the long sleeve is made from lining material and when this sleeve is used it is loosely tacked (stitched) in place by hand temporarily.

The lower sleeve, showing the top portion of lining fabric that is tacked inside the bodice sleeve head
To transform the dress into an evening gown, the lower half of the sleeve is simply removed.


Just like the original gown that the pattern was taken from, the sleeves are decorated with two simple bands of fabric that form cuffs. These also disguise the join when the long sleeves are added.

Sleeve detail

Saturday 16 July 2016

Bodice Construction - Part I

39 days to go...

Work is progressing well on the silk dress and I thought I would share some of the stages of the bodice construction.

Preparing to cut the fabric

Firstly, I cut all of the dress pieces from both the silk and the lining. It took some time to carefully position the pieces to ensure that the stripes matched where I wanted them to. The darts and curved seams of Victorian patterns make it impossible to match all of the seams but I chose to make sure that the front matched on the diagonal to create a chevron on the centre seam.

Some quick research into original dresses showed this way of using striped fabric to create visual interest was used in the 1840s. Both of these dresses from The Manchester Gallery of Costume feature striped fabrics that have been cut to create a distinctive chevron pattern on the front of the bodice. You can click on the pictures below to find out more about each dress.

 1840s Day Dress, Manchester Gallery of Costume

Tartan Wedding Dress, 1849, Manchester Gallery of Costume
Once all of my pieces had been cut out, I matched all of the silk pieces with the cotton lining. The bodice is flat-lined which means that each lining piece is pinned to the back of its corresponding silk panel. These are then treated and stitched as one piece of fabric. To make them easier to handle you can edge stitch around the pieces to prevent the fabric from moving. However, I chose not to do this as I did not want visible machine stitching even on the inside of the dress. To make the dress more authentic I am hand-stitching the majority of the bodice, including hand-finishing the seams.

Matching silk and lining pieces cut out

Positioning and pinning the lining to the silk
I stitched the front pieces first as there is no piping on the front seams. First of all using the pattern and a tape measure I marked the seam lines for darts (the triangular slits at the front) on the lining side of the fabric. Closing these darts gives the bodice a three-dimensional shape which is slimmer at the waist and shaped to accommodate the bust.

Marking the seam lines for the darts

The darts stitched closed

 Before stitching the rest of the bodice, I then applied piping to the side and back seams. The piping cord is positioned on the outside of the seam line. When the pieces are stitched together, the piping sits on the outside of the seam.

Piping applied to the side back panel

I also turned in and slip-stiched down the facings at the centre back where the bodice will open and close.

Centre back facing slip-stitched to the lining
It was then time to attach all of the pieces together, paying careful attention to matching the stripes at the front and sewing as closely and neatly as possible next to the piping.

The inside of the bodice
The seams are carefully ironed on both sides to press them flat. Curved seams are clipped at intervals to allow them to lie flat. This can be done with a simple snip finishing just before the stitching but I chose to cut out small shaped triangles as this is the technique that I have seen used on curved seams in many original garments. It also creates an attractive seam finish on the inside. All of the raw edges where whip-stitched to finish the edges. This involves taking quick single stitches at a slight angle that loop around the raw edge and help to prevent the fabric from fraying.

Piping on the bottom edge

Finally, the top and bottom edges were finished with piping. On the top edge, the seam allowance of the piping was turned to the inside, folded over and stitched to the lining. However, on the bottom, I have left about 2/8" of fabric below the piping where I will attach the skirt.

In my next post I will share how I have created convertible sleeves which can be worn either long or short to make this dress suitable to wear in the day and in the evening.